This section will guide you through an example of creating a custom template in NamicSoft. This hands-on example will help you understand the process and apply these steps to create your own templates.
Prerequisites:
- Microsoft Word (desktop application). The cloud-based version of Microsoft Word does not support all the features necessary for this process, such as certain Content Control functionalities.
Step 1: Identify Your Target Design
Before diving into the technical aspects of creating a NamicSoft Template, the first crucial step is to decide on your target design. This will guide the entire process of template creation. You have two primary options to start with:
- Option 1: Utilize an Existing Template
If you already have a Microsoft Word document that you wish to convert into a NamicSoft Template, use this as your starting point. This approach is ideal if you have a specific layout or design in mind that you want to retain in the final template. - Option 2: Start with Pre-Designed Examples
For those who do not have a pre-existing template or are looking for inspiration, NamicSoft provides a range of example templates. These can serve as a solid foundation for your custom template. Explore these examples to understand different layout possibilities and functionalities that you can incorporate into your design
Example ‘Repeat information for each host’
In this example, we’ve identified that the ‘Repeat information for each host’ template in NamicSoft has a structure similar to what we need for our custom “Vulnerability Report” template.
To begin, we navigate to the NamicSoft installation path, where the existing templates are stored. You can typically find these in INSTALLPATH\wwwroot\Templates\Files. Once there, we locate and open the ‘Repeat information for each host’ template to use as a foundation for our new report.”
Step 2: Copy the Design to a New Template File
Once you have identified your target design, the next step is to transfer this design into a new Microsoft Word document, which will become your custom NamicSoft Template.
Important Consideration: Entering Design Mode
Before you start copying the content, it is essential to enter Design Mode in Microsoft Word. This ensures that all Content Control data, including the controls themselves and any embedded instructions or queries, are copied accurately.
- To enter Design Mode, go to the Developer tab in the ribbon. If the Developer tab is not visible, enable it by going to
File>Options>Customize Ribbonand then checking the Developer option. - Once in the Developer tab, click on ‘Design Mode’.
Proceed with the following steps after activating Design Mode:
- Copy the relevant Content Controls: Copy the relevant Content Controls to your target template.
Example: Transferring a Content Control from ‘Repeat Information for Each Host’ to a Custom Template
To effectively transfer a specific Content Control from the ‘Repeat information for each host’ template to your custom template, it’s essential to have both documents open in Design Mode. This allows for accurate interaction with all Content Controls. In this example, we will focus on transferring the ‘Column-based-table’ Content Control.
Open Both Templates in Design Mode:
- Open the Original Template: Start by opening the ‘Repeat information for each host’ template in Microsoft Word.
- Open Your Target Template: In a separate Word window, open the template you are creating.
- Activate Design Mode: In both documents, go to the Developer tab and click on ‘Design Mode’ to enable it. This step is crucial for working with Content Controls.
Copy the Content Control:
- Locate the Control: In the ‘Repeat information for each host’ template, find the ‘Column-based-table’ Content Control.
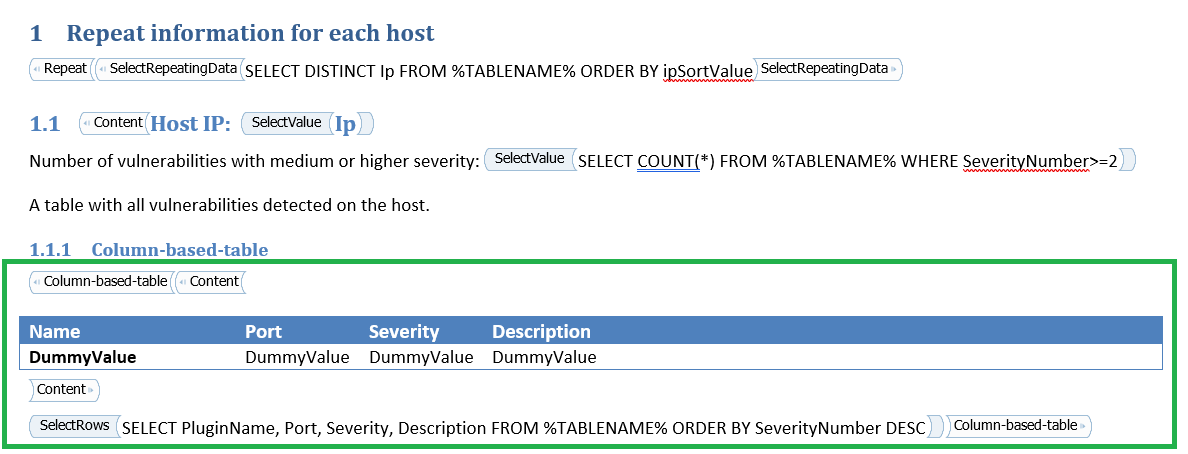
- Select and Copy: Highlight the entire Content Control, ensuring you select it from start to finish. The area will be highlighted in green (refer to the image below for guidance). Copy it using
Ctrl + Cor by right-clicking and selecting ‘Copy’.
Paste into Your Target Template:
- Switch to Your Template: Move to the window with your target template.
- Paste the Control: Click where you want the Content Control to go, then paste it using
Ctrl + Vor right-click and select ‘Paste’.
Save Your Changes:
- After pasting, adjust the Content Control as needed to suit your design and data requirements. This may involve resizing, reformatting, or modifying embedded queries.
- Save your document to apply these changes, ensuring your template is updated.
Important Reminder: Always work in Design Mode when handling Content Controls to maintain their functionality during the transfer between documents.
Step 3: Making Necessary Adjustments to the Template
Before diving into customizing your template, we highly recommend reading through our “Tips and Tricks for Effective Template Design in NamicSoft Portal” support page. This page provides valuable insights and best practices that can greatly assist you in effectively modifying your template. It covers common pitfalls to avoid and offers practical advice on customization, ensuring a smoother and more efficient workflow.
Once you’re familiar with these helpful pointers, proceed with the adjustments:
Determine the Information to Display
- Define Your Data Requirements: Consider what information is most relevant for your report. This could include details like vulnerability severity, affected systems, dates, etc.
- Modify Content Control Settings: Click on the Content Control in Design Mode. Adjust the embedded SQLite query or properties to ensure it fetches and displays the correct data. This might involve writing or editing SQL queries to pull specific information from your dataset.
Make Graphical Changes
- Adjust Layout and Formatting: Customize the look and feel of the Content Control to match your report’s overall design. This includes adjusting fonts, colors, sizes, and other formatting options.
Finalize Your Template
- Save Your Changes: After making the necessary adjustments and ensuring everything aligns with your requirements, save your template.
- Run Tests: We advise making incremental changes and regularly testing the template by generating a NamicSoft report. This approach helps identify and rectify any issues early in the process.
Note: Customizing a template, particularly when dealing with complex data queries and sophisticated design elements, may involve some trial and error. Feel free to experiment with various layouts and settings to find the most effective outcome for your needs.
Example: Making Adjustments
To effectively transfer a specific Content Control from the ‘Repeat information for each host’ template to your custom template, it’s essential to have both documents open in Design Mode. This allows for accurate interaction with all Content Controls. In this example, we will focus on transferring the ‘Column-based-table’ Content Control.
Template Before Changes
Initially, the template retrieves PluginName, Port, Severity, and Description, sorting the data by SeverityNumber in descending order to highlight the most critical issues first.
Template After Changes
The template now includes the CVSS v3 Base Score, with results sorted in descending order based on this score for enhanced prioritization. Visually, it’s been updated with a new color scheme and smaller fonts for a cleaner, more streamlined look.
Step 4: Testing and Refining Your Template
- Generate a Report in NamicSoft Portal:
- Launch NamicSoft Portal and add your new template.
- Select your template to create a report. Ensure that there is relevant data in your current assessment for accurate testing.
- Review the Report Output:
- Carefully examine the report generated using your template. Focus on how the data is presented, checking the layout, the order in which the data is sorted, and the accuracy of the information displayed.
- It’s essential to ensure that the template not only looks good but also correctly represents the data as intended.
- Iterative Refinement
- Based on your observations, return to your template to make any necessary adjustments. This might include modifying the layout, changing sorting parameters, or correcting data presentation issues.
- After making changes, save them and re-run the report in NamicSoft Portal to test the impact of your modifications.
Example: Report
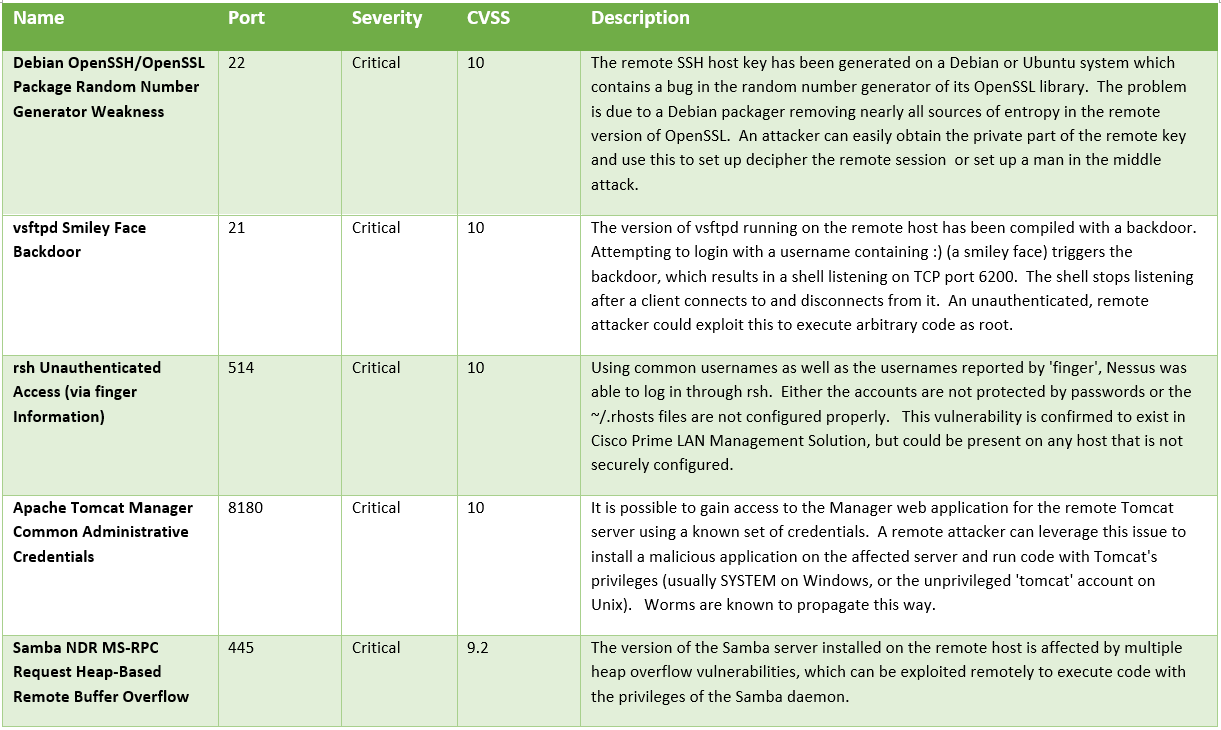
The newly customized template was added to NamicSoft Portal, where a demo assessment, complete with hosts and vulnerabilities, had been loaded. The resulting report provides a clear view of how the template functions in a real-world scenario.
- In this screenshot, observe the effective data display, including the overall layout, sorting method, and information representation.
- Notably, the ‘CVSS v3 Base Score’ has been successfully integrated into the report, with data sorted in descending order based on this score, reflecting the recent modifications to the template.


